Android에서 Tesseract 사용하기 for OCR
Python에서 Tesseract 사용하기 for OCR에서는 Python 환경에서 Tesseract 사용 방법을 알아 봤다. 이번에는 모바일 환경에서 카메라를 이용해 이미지를 촬영하고, 해당 이미지에 대해 동시에 OCR을 수행하기 위해 Android에서 Tesseract를 사용하는 방법을 알아볼 것이다. 글에서 다루는 안드로이드 Tesseract 샘플 프로젝트는 Github를 통해 받을 수 있다.
Android Tesseract
안드로이드 환경에서 Tesseract를 이용하기 위해서는 NDK 및 Android openCV를 사용할 수 있는 개발 환경을 설정해주어야 한다.
NDK + OpenCV 개발 환경 구축하기
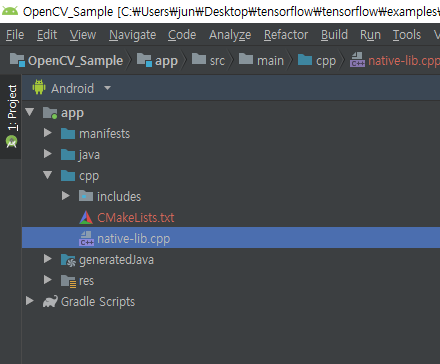
우선, Android Studio에서 새로운 프로젝트를 생성할 때, (Android Studio3.3 기준)Native C++ 템플릿을 선택해준다/image/how_to_use_tesseract_in_android/img_01.png)
Native C++ 템플릿을 선택 후 프로젝트를 생성할 경우 일반적인 안드로이드 프로젝트와 달리 cpp 폴더와 내부에 native-lib.cpp 파일이 함께 생성된다.
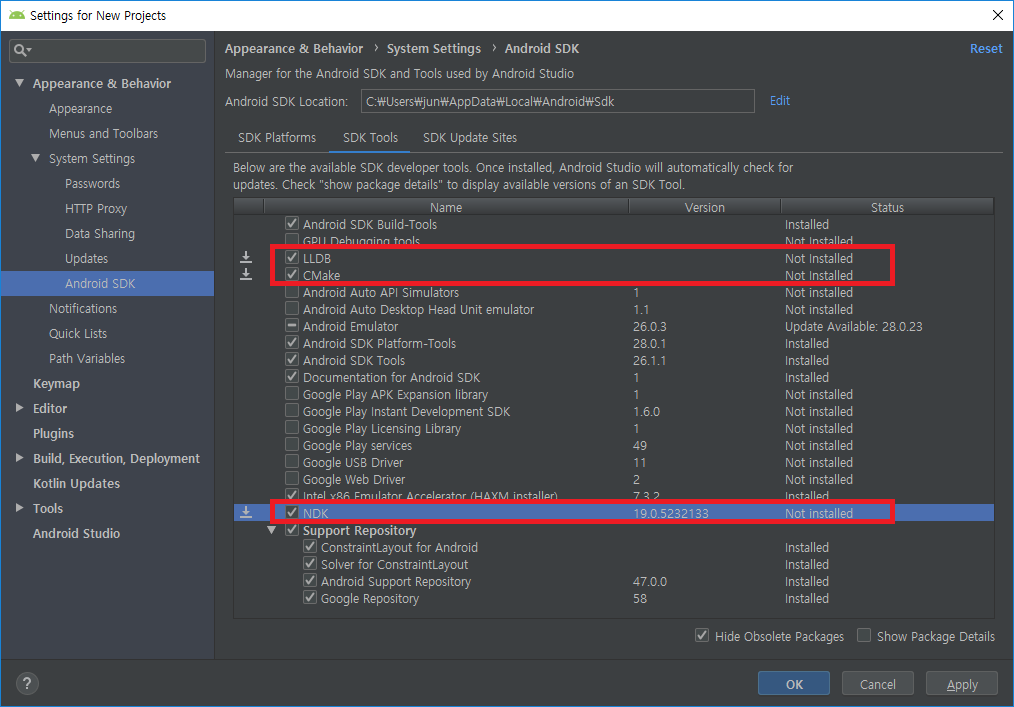
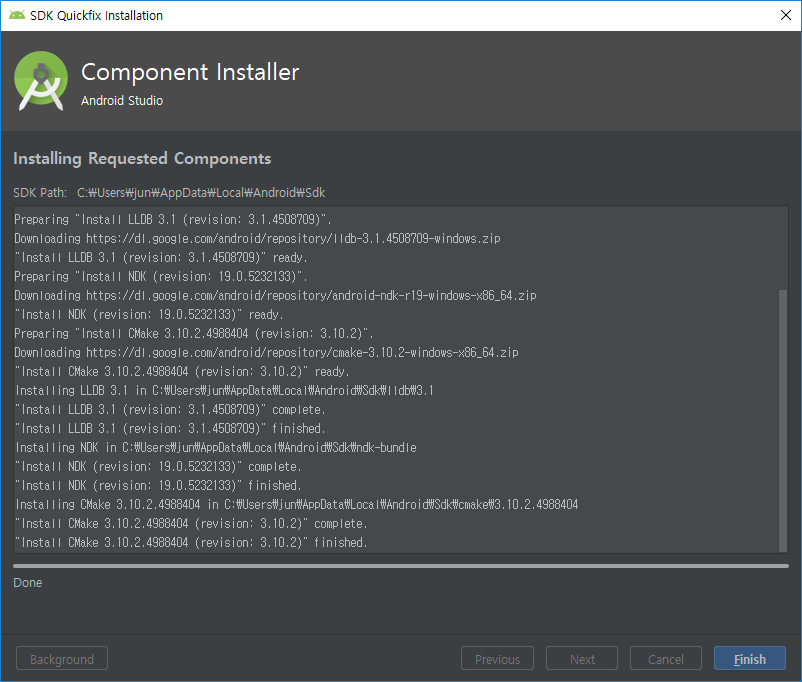
아직 NDK 및 CMake, LLDB가 설치되어 있지 않을 경우 SDK Manager를 통해 설치해주면 된다.

Android 개발환경에서 OpenCV를 사용하기 위해서는 안드로이드용 OpenCV SDK를 별도로 설치해줘야 한다. 설치링크
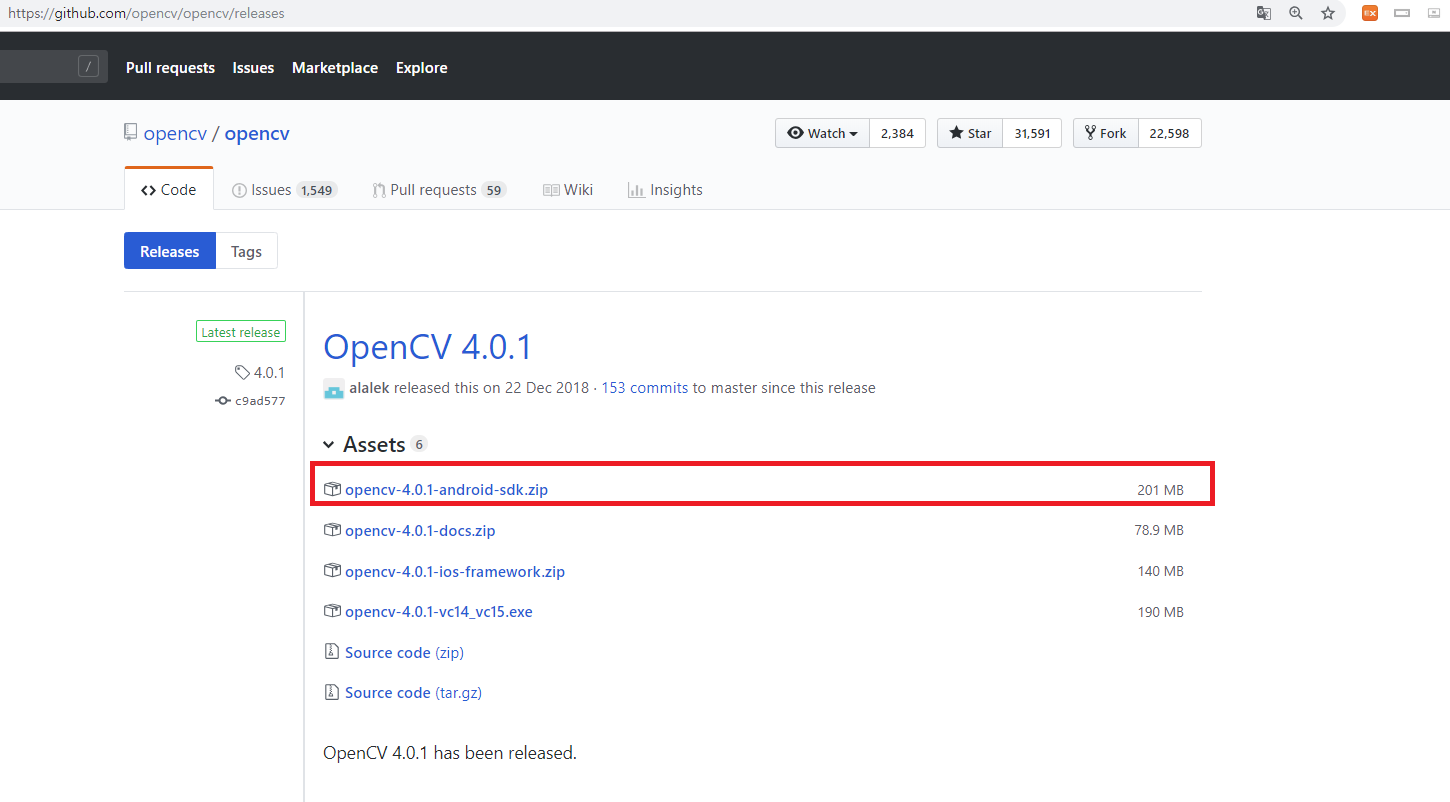
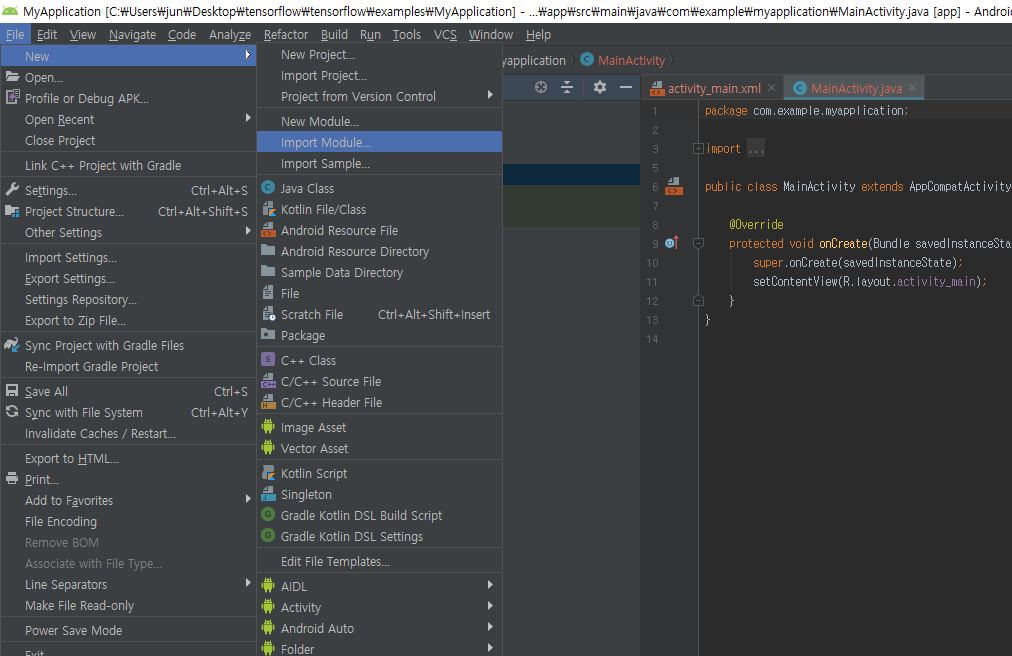
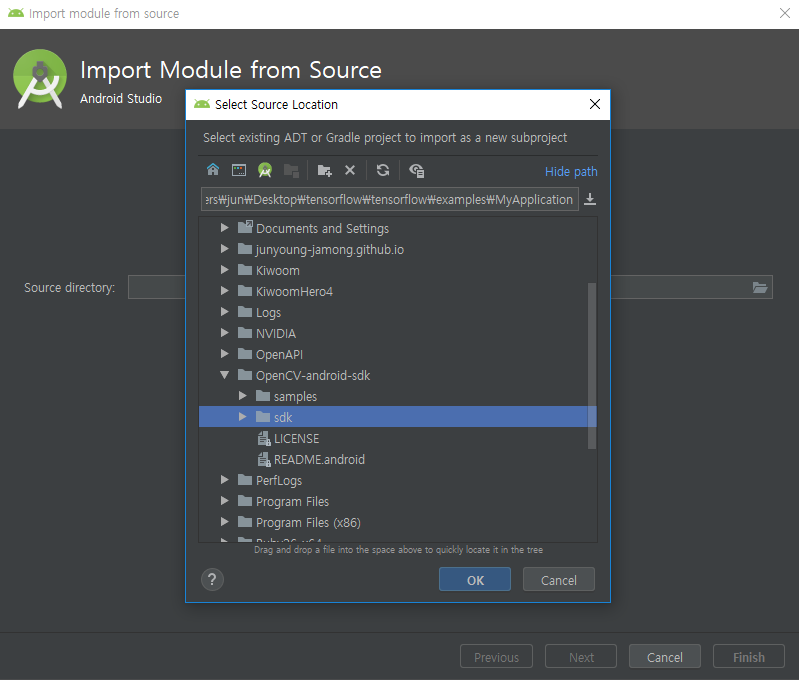
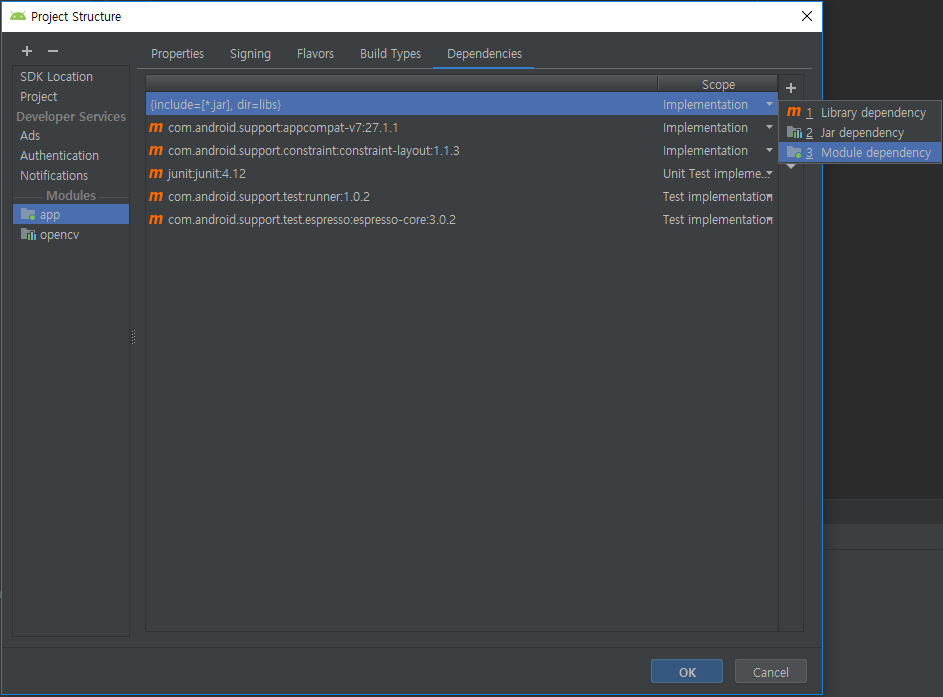
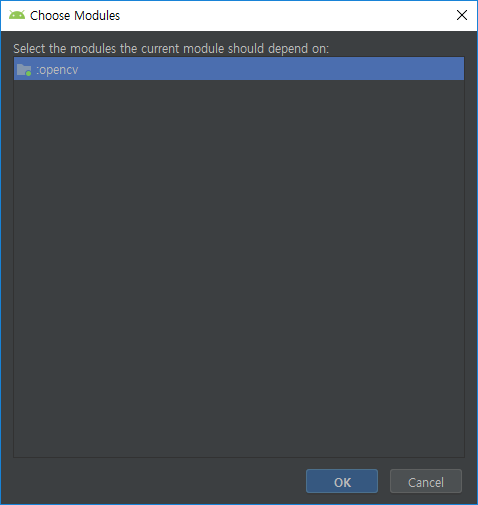
다운받은 Android OpenCV SDK 압축파일을 해제한 후 프로젝트에 Module로 추가해준다.

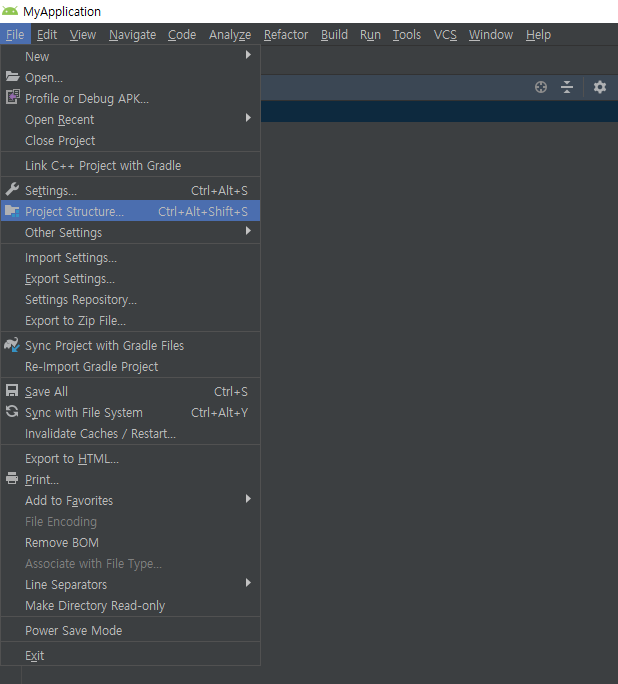
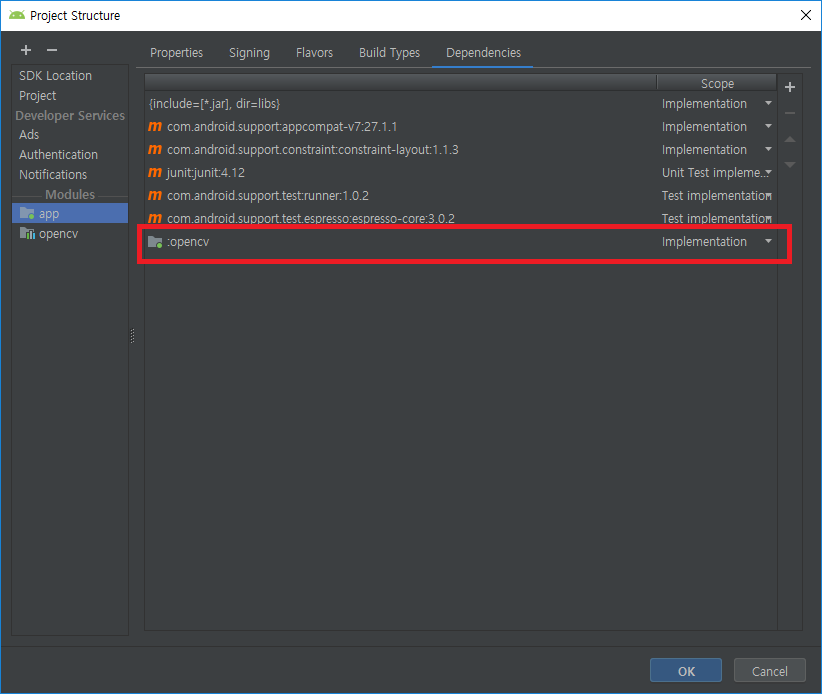
OpenCV 모듈 Import를 완료하였다면, 프로젝트에 라이브러리로 등록해준다.
Android Tesseract 사용하기
Android에서 Tesseract 라이브러리를 등록하는 방법은 간단하다. bulid.gradle (Module:app) 파일에서 dependencies 부분에 아래 코드를 추가한다.
dependencies {
    ...
    implementation 'com.rmtheis:tess-two:9.0.0'
}
기본적으로 안드로이드 앱에서 카메라를 이용하기 위해 SurfaceView를 사용하는데, 여기서는 SurfaceView를 상속받는 CameraSurfaceView를 정의한다. 해당 코드는 기본적인 안드로이드 카메라 사용 관련 코드임으로 자세한 설명은 생략한다.
CameraSurfaceView.java
package jy.demo.tesseract.android;

import android.content.Context;
import android.content.res.Configuration;
import android.hardware.Camera;
import android.util.AttributeSet;
import android.view.SurfaceHolder;
import android.view.SurfaceView;
import android.view.View;

public class CameraSurfaceView extends SurfaceView implements SurfaceHolder.Callback{
    SurfaceHolder surfaceHolder;
    Camera camera = null;

    Context context;

    public CameraSurfaceView(Context context) {
        super(context);
        init(context);
    }

    public CameraSurfaceView(Context context, AttributeSet attrs) {
        super(context, attrs);
        init(context);
    }

    private void init(Context context)
    {
        this.context = context;
        surfaceHolder = getHolder();
        surfaceHolder.addCallback(this);
        setFocusableInTouchMode(true);
        setFocusable(true);

    }

    @Override
    public void surfaceCreated(SurfaceHolder surfaceHolder) {
        camera = Camera.open();

        try{
            Camera.Parameters parameters = camera.getParameters();

            if (getResources().getConfiguration().orientation != Configuration.ORIENTATION_LANDSCAPE) {
                parameters.set("orientation", "portrait");
                camera.setDisplayOrientation(90);
                parameters.setRotation(90);
            } else {
                parameters.set("orientation", "landscape");
                camera.setDisplayOrientation(0);
                parameters.setRotation(0);
            }
            camera.setParameters(parameters);
            camera.setPreviewDisplay(surfaceHolder);
        }catch(Exception e)
        {
            e.printStackTrace();
        }

        this.setOnClickListener(new OnClickListener() {
            @Override
            public void onClick(View view) {
                camera.autoFocus(new Camera.AutoFocusCallback() {
                    @Override
                    public void onAutoFocus(boolean b, Camera camera) {

                    }
                });
            }
        });
    }

    @Override
    public void surfaceChanged(SurfaceHolder surfaceHolder, int i, int i1, int i2) {
        camera.startPreview();
    }

    @Override
    public void surfaceDestroyed(SurfaceHolder surfaceHolder) {
        camera.stopPreview();
        camera.release();
        camera = null;
    }

    public boolean capture(Camera.PictureCallback callback)
    {
        if (camera != null)
        {
            camera.takePicture(null, null, callback);
            return true;
        }
        else
        {
            return false;
        }
    }
}
안드로이드 앱에서 카메라 및 관련 기능을 사용하기 위해 Manifest파일에 권한을 등록해줘야 한다.
AndroidManifest.xml
<?xml version="1.0" encoding="utf-8"?>
<manifest xmlns:android="http://schemas.android.com/apk/res/android"
    package="jy.demo.tesseract.android">

    <uses-permission android:name="android.permission.CAMERA"/>

    <uses-feature
        android:name="android.hardware.camera"
        android:required="false" />
    <uses-feature
        android:name="android.hardware.camera.autofocus"
        android:required="false" />
    <uses-feature
        android:name="android.hardware.camera.front"
        android:required="false" />
    <uses-feature
        android:name="android.hardware.camera.front.autofocus"
        android:required="false" />

    <supports-screens
        android:anyDensity="true"
        android:largeScreens="true"
        android:normalScreens="true"
        android:resizeable="true"
        android:smallScreens="true" />

    <application
        android:allowBackup="true"
        android:icon="@mipmap/ic_launcher"
        android:label="@string/app_name"
        android:roundIcon="@mipmap/ic_launcher_round"
        android:supportsRtl="true"
        android:theme="@style/AppTheme">
        <activity android:name=".MainActivity">
            <intent-filter>
                <action android:name="android.intent.action.MAIN" />

                <category android:name="android.intent.category.LAUNCHER" />
            </intent-filter>
        </activity>
    </application>

</manifest>
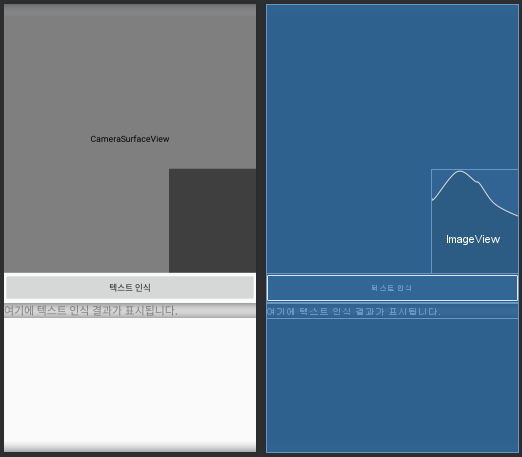
UI화면은 아래와 같이 구성하였다. 직접 정의한 CameraSurfaceView, 촬영한 이미지를 보여주는 ImageView, 캡쳐를 위한 버튼, 그리고 하단에는 OCR 결과 텍스트를 보여주기 위한 TextView가 있다.
activity_main.xml
<?xml version="1.0" encoding="utf-8"?>
<LinearLayout xmlns:android="http://schemas.android.com/apk/res/android"
    xmlns:app="http://schemas.android.com/apk/res-auto"
    xmlns:tools="http://schemas.android.com/tools"
    android:layout_width="match_parent"
    android:layout_height="match_parent"
    android:orientation="vertical"
    tools:context=".MainActivity">

    <FrameLayout
        android:layout_width="match_parent"
        android:layout_height="match_parent"
        android:layout_weight="0.3">

        <jy.demo.tesseract.android.CameraSurfaceView
            android:id="@+id/surfaceView"
            android:layout_width="match_parent"
            android:layout_height="match_parent" />

        <ImageView
            android:id="@+id/imageView"
            android:layout_width="142dp"
            android:layout_height="170dp"
            android:layout_gravity="bottom|right"
            app:srcCompat="@android:drawable/screen_background_dark_transparent" />

    </FrameLayout>

    <FrameLayout
        android:layout_width="match_parent"
        android:layout_height="match_parent"
        android:layout_weight="0.7">

        <Button
            android:id="@+id/button"
            android:layout_width="match_parent"
            android:layout_height="wrap_content"
            android:layout_margin="0dp"
            android:layout_marginLeft="16dp"
            android:layout_marginRight="16dp"
            android:text="텍스트 인식" />
    </FrameLayout>

    <FrameLayout
        android:layout_width="match_parent"
        android:layout_height="match_parent"
        android:layout_weight="0.5">

        <ScrollView
            android:layout_width="match_parent"
            android:layout_height="match_parent">

            <LinearLayout
                android:id="@+id/scrollViewLayout"
                android:layout_width="match_parent"
                android:layout_height="match_parent"
                android:orientation="vertical">

                <TextView
                    android:id="@+id/textView"
                    android:layout_width="match_parent"
                    android:layout_height="match_parent"
                    android:text="여기에 텍스트 인식 결과가 표시됩니다."
                    android:textSize="18sp" />
            </LinearLayout>
        </ScrollView>

    </FrameLayout>

</LinearLayout>
마지막으로 MainActivity에서는 실질적으로 카메라를 이용하여 이미지를 캡쳐하고, 해당 이미지에 대한 OCR을 수행하는 코드를 포함한다.
MainActivity.java
package jy.demo.tesseract.android;

import android.content.res.AssetManager;
import android.graphics.Bitmap;
import android.graphics.BitmapFactory;
import android.graphics.Matrix;
import android.hardware.Camera;
import android.os.AsyncTask;
import android.support.v7.app.AppCompatActivity;
import android.os.Bundle;
import android.view.View;
import android.widget.Button;
import android.widget.ImageView;
import android.widget.TextView;
import android.widget.Toast;

import com.googlecode.tesseract.android.TessBaseAPI;

import java.io.File;
import java.io.FileOutputStream;
import java.io.IOException;
import java.io.InputStream;
import java.io.OutputStream;

public class MainActivity extends AppCompatActivity{
    TessBaseAPI tessBaseAPI;

    Button button;
    ImageView imageView;
    CameraSurfaceView surfaceView;
    TextView textView;

    @Override
    protected void onCreate(Bundle savedInstanceState) {
        super.onCreate(savedInstanceState);
        setContentView(R.layout.activity_main);

        imageView = findViewById(R.id.imageView);
        surfaceView = findViewById(R.id.surfaceView);
        textView = findViewById(R.id.textView);

        button = findViewById(R.id.button);
        button.setOnClickListener(new View.OnClickListener() {
            @Override
            public void onClick(View view) {
                capture();
            }
        });

        tessBaseAPI = new TessBaseAPI();
        String dir = getFilesDir() + "/tesseract";
        if(checkLanguageFile(dir+"/tessdata"))
            tessBaseAPI.init(dir, "eng");
    }

    boolean checkLanguageFile(String dir)
    {
        File file = new File(dir);
        if(!file.exists() && file.mkdirs())
            createFiles(dir);
        else if(file.exists()){
            String filePath = dir + "/eng.traineddata";
            File langDataFile = new File(filePath);
            if(!langDataFile.exists())
                createFiles(dir);
        }
        return true;
    }

    private void createFiles(String dir)
    {
        AssetManager assetMgr = this.getAssets();

        InputStream inputStream = null;
        OutputStream outputStream = null;

        try {
            inputStream = assetMgr.open("eng.traineddata");

            String destFile = dir + "/eng.traineddata";

            outputStream = new FileOutputStream(destFile);

            byte[] buffer = new byte[1024];
            int read;
            while ((read = inputStream.read(buffer)) != -1) {
                outputStream.write(buffer, 0, read);
            }
            inputStream.close();
            outputStream.flush();
            outputStream.close();
        }catch (IOException e) {
            e.printStackTrace();
        }
    }

    private void capture()
    {
        surfaceView.capture(new Camera.PictureCallback() {
            @Override
            public void onPictureTaken(byte[] bytes, Camera camera) {
                BitmapFactory.Options options = new BitmapFactory.Options();
                options.inSampleSize = 8;

                Bitmap bitmap = BitmapFactory.decodeByteArray(bytes, 0, bytes.length);
                bitmap = GetRotatedBitmap(bitmap, 90);

                imageView.setImageBitmap(bitmap);

                button.setEnabled(false);
                button.setText("텍스트 인식중...");
                new AsyncTess().execute(bitmap);

                camera.startPreview();
            }
        });
    }

    public synchronized static Bitmap GetRotatedBitmap(Bitmap bitmap, int degrees) {
        if (degrees != 0 && bitmap != null) {
            Matrix m = new Matrix();
            m.setRotate(degrees, (float) bitmap.getWidth() / 2, (float) bitmap.getHeight() / 2);
            try {
                Bitmap b2 = Bitmap.createBitmap(bitmap, 0, 0, bitmap.getWidth(), bitmap.getHeight(), m, true);
                if (bitmap != b2) {
                    bitmap = b2;
                }
            } catch (OutOfMemoryError ex) {
                ex.printStackTrace();
            }
        }
        return bitmap;
    }

    private class AsyncTess extends AsyncTask<Bitmap, Integer, String> {
        @Override
        protected String doInBackground(Bitmap... mRelativeParams) {
            tessBaseAPI.setImage(mRelativeParams[0]);
            return tessBaseAPI.getUTF8Text();
        }

        protected void onPostExecute(String result) {
            textView.setText(result);
            Toast.makeText(MainActivity.this, ""+result, Toast.LENGTH_LONG).show();

            button.setEnabled(true);
            button.setText("텍스트 인식");
        }
    }
}
텍스트 인식에 중요한 부분만 간단하게 살펴보기로 하자.
우선, Tesseract 사용을 위한 관련 클래스 객체를 생성해줘야 한다. TessBaseAPI 클래스 객체를 위한 참조변수를 정의하였다.
TessBaseAPI tessBaseAPI;
OnCreate 내부에서 TessBaseAPI 객체를 생성하고, Tesseract OCR에 적용할 언어를 지정한다. 언어 관련 파일은 사전에 assets 폴더나 외장 스토리지에 저장해둬야 이용할 수 있다.
tessBaseAPI = new TessBaseAPI();
String dir = getFilesDir() + "/tesseract";
if(checkLanguageFile(dir+"/tessdata"))
    tessBaseAPI.init(dir, "eng");
각 언어별 학습 데이터는 다음 링크에서 받을 수 있다. https://github.com/tesseract-ocr/tessdata
한글 데이터
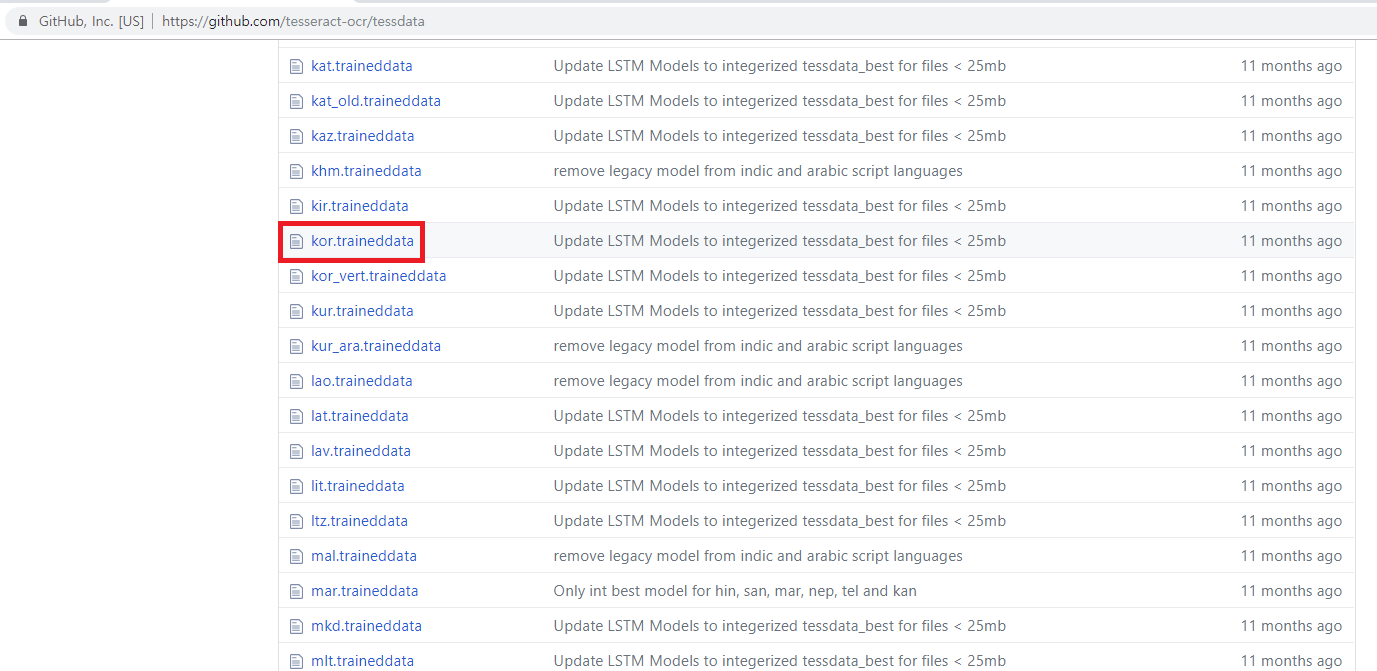
영문 데이터

여기서는 Assets 폴더에 미리 언어 파일을 저장하고, 처음 프로그램이 실행되면, 내부 디렉토리에 파일을 복사하여 사용하는 방식으로 진행된다. 이럴 경우 각 기기마다 별도로 언어파일을 외장 스토리지에 저장할 필요가 없어진다.
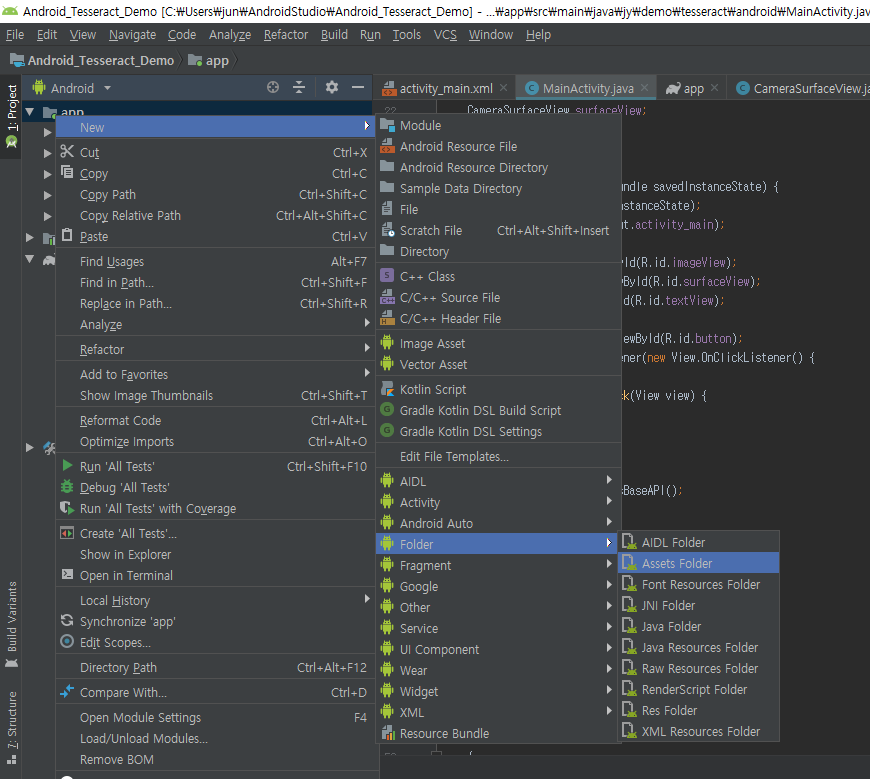
Assets 폴더는 아래와 같이 생성할 수 있다.
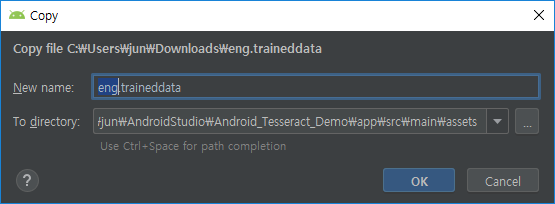
다운받은 적용할 언어 데이터 파일을 해당 디렉토리에 Copy&Paste 해주면 된다.

프로그램 처음 실행 시 checkLanguageFile() 함수를 통해 내부 디렉토리에 해당 파일이 존재하는 지 체크하고, 없을 경우 createFiles() 함수에서 Assets 폴도 내 언어 데이터 파일을 읽어 지정된 경로에 파일을 복사한다.
텍스트 인식 버튼 클릭 시 capture() 함수가 호출되는데, 여기서 surfaceView를 통해 이미지를 캡쳐하고, 해당 이미지를 imageView에 표시한다. 또한 동일한 이미지를 tesseract ocr 입력 데이터로 사용한다.
private void capture()
    {
        surfaceView.capture(new Camera.PictureCallback() {
            @Override
            public void onPictureTaken(byte[] bytes, Camera camera) {
                BitmapFactory.Options options = new BitmapFactory.Options();
                options.inSampleSize = 8;

                Bitmap bitmap = BitmapFactory.decodeByteArray(bytes, 0, bytes.length);
                bitmap = GetRotatedBitmap(bitmap, 90);

                imageView.setImageBitmap(bitmap);

                button.setEnabled(false);
                button.setText("텍스트 인식중...");
                new AsyncTess().execute(bitmap);

                camera.startPreview();
            }
        });
    }
tessBaseAPI 클래스 객체의 setImage 함수의 인자로 이미지를 설정하고 getUTF8Text()를 통해 텍스트 추출 결과를 얻을 수 있다.
private class AsyncTess extends AsyncTask<Bitmap, Integer, String> {
        @Override
        protected String doInBackground(Bitmap... mRelativeParams) {
            tessBaseAPI.setImage(mRelativeParams[0]);
            return tessBaseAPI.getUTF8Text();
        }

        protected void onPostExecute(String result) {
            textView.setText(result);
            Toast.makeText(MainActivity.this, ""+result, Toast.LENGTH_LONG).show();

            button.setEnabled(true);
            button.setText("텍스트 인식");
        }
    }
실질적으로는 tessBaseAPI.setImage(); tessBaseAPI.getUTF8Text(); 두 개의 함수 호출로 이미지로부터 텍스트를 인식/추출할 수 있다.